 |
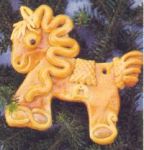
Mrs. Suete from Austria explains how, in her country, children enjoy making Christmas decorations from a homemade modelling dough that is easy to work with. You can roll out the dough and cut out shapes, and then fashion small pieces into decorations and stick them on to form hair, beards and other fun shapes. Even adults join into the act during the holiday season. This tradition goes far back in time to the days of the ancient Egyptians and the pharaohs, when little figurines would be crafted as offerings for the gods. The Greeks improved on the formula to create terra cotta, a pliable and fairly sturdy paste that was used to make vases, pots, etc.
Warning! These cookies are for decoration only and are not meant to be eaten. They are inedible, meaning you risk a very bad stomach ache if you eat them!

Basic Materials for 6 medium cookies or 12 small ones
- 500 ml (2 c.) all-purpose flour
- 250 ml (1 c.) salt
- 1 tbsp. vegetable oil
- 250 ml (1 c.) water
- Egg white for "glue"
Decorating materials (as desired)
- Colored cake-decorating sprinkles
- Peppercorns, coffee beans
- Cloves
- Nuts
- Dried beans
- Uncooked noodles
- Watercolor paint
- Clear varnish
You will also need:
- A rolling pin
- Cookie cutters
- 1 knife
- Paint brushes
- Aluminum foil or oven-proof parchment paper

Basic recipe
- Combine the flour and salt and place them in a mound on the kitchen counter or on a cookie sheet;
- with your fingers, make a well in the centre and pour in the water and oil;
- flour your hands and knead the dough, mixing the liquid together with the flour and salt for 4 minutes;
- place a large piece of aluminum foil or parchment on the counter and flour lightly;
- divide the ball of dough into 2 or 3 pieces; flatten each ball on the foil or parchment with the rolling pin to obtain a large flat piece about 3/4 cm (1/3") thick (slightly less thick than your little finger);
- using a knife or cookie cutter, cut out shapes: angels; animals; dolls, etc. Keep the paper on the bottom.
- When all the dough has been rolled and cut out, create some texturing if you wish (see techniques);
- brush each shape with egg white (this acts as glue);
- with the left over bits of dough, create decorations for your figures (see techniques and decorating material); dip each piece into the egg white and stick it onto the cookie.
- Using a pointed object, make a small hole in the top of the decoration (when the decorations are finished, you will be able to put a string through it); let dry for one hour.
Baking and finishing - 6 hours
This takes a lot of time because the dough has to harden like cement before you can decorate it.
- Gently pick up each cookie with the help of the foil or parchment; place on a cookie sheet;
- preheat the oven to 160° C (300° F); place the cookie sheet in the oven and let bake 30 minutes;
- increase the oven temperature to 180° C (350° F) and bake 30 minutes longer;
- increase the oven temperature to 200° C (400° F) and continue baking for 10 to 30 minutes. Watch the cookies closely. As soon as they become lightly browned, immediately turn off the oven but let them rest in the oven for 3 hours;
- remove from the oven; take the foil or parchment off the back of each cookie; with a brush, apply a coat of varnish and let dry;
- thread a string though the hole; tie and hang on the Christmas tree.
Techniques and tips
- Use a comb to create a grooved texture
- a toothbrush
- place a small ball of dough in a garlic press; as you press, the dough becomes "angel hair," perfect for making hair, a beard, a lion's mane, sheep's wool, etc.
- roll out a piece of dough with the palms of your hands to make a string - you can then cut it into short lengths to form a mouth, the outline of clothing, etc. and stick them onto your cookies
- you can take three "strings" of dough and braid them to make doll's hair.
The possibilities are limited only by your imagination!
You can even give them as gifts.

-

 Recipes
-

 Products
-

 Entertaining
-

 Chefs
Chefs
-

 Hints & Tips
-

 Glossaries


